Tooling integration - SwaggerHub
To use this feature, you will need:
- A PactFlow account (create a free account).
- A SwaggerHub account (create a free account).
In this guide, you'll learn how to use PactFlow and SwaggerHub together, to add contract testing to your design first API development workflow.
Benefits
PactFlow and SwaggerHub can be combined to increase the quality of your design-first API development workflow and help navigate microservice rollout complexity.
SwaggerHub is the foundation of a repeatable API Development process, providing a secure collaborative environment for your API design process:
- It unifies teams around a single source of truth - the OAS - and enables standardisation across your services
- Allows teams to work independently
- Unlocks automation such as code-generation and mock services
PactFlow brings increased visibility into how consumers use your API, enabling:
- API consumer and API producer development teams to work in independently and safely
- Prevent breaking changes to your API and releasing an incompatible API consumer
- A reduction in API versioning, avoiding the need to create and maintain multiple versions of an API, and communicating the change to consumers.
Together, they allow faster feedback cycles from design through to development, test and release.
Pre-requisites
- A PactFlow account (create a free account).
- A SwaggerHub account (create a free account).
Integration Guide
1. Design your first API in SwaggerHub
Follow this guide to create your first API in SwaggerHub.
Next steps: now that we have agreed on our design, we can start our implementation.
We can start to work on all the next major sections (3, 4 and 5) in parallel. In this guide, we will work through the steps in a sequential manner to simplify the explanation.
2. Setup your API Mock Environment (Optional)
The API Auto Mocking integration creates and maintains a semi-static mock of your API based on the responses and examples defined in your OpenAPI 3.0 or 2.0 definition. The mock is updated every time you save your API. The mock helps you test your API when designing it, before developers implement it. Also, the mock allows developers to start building client applications before the API back end is ready.
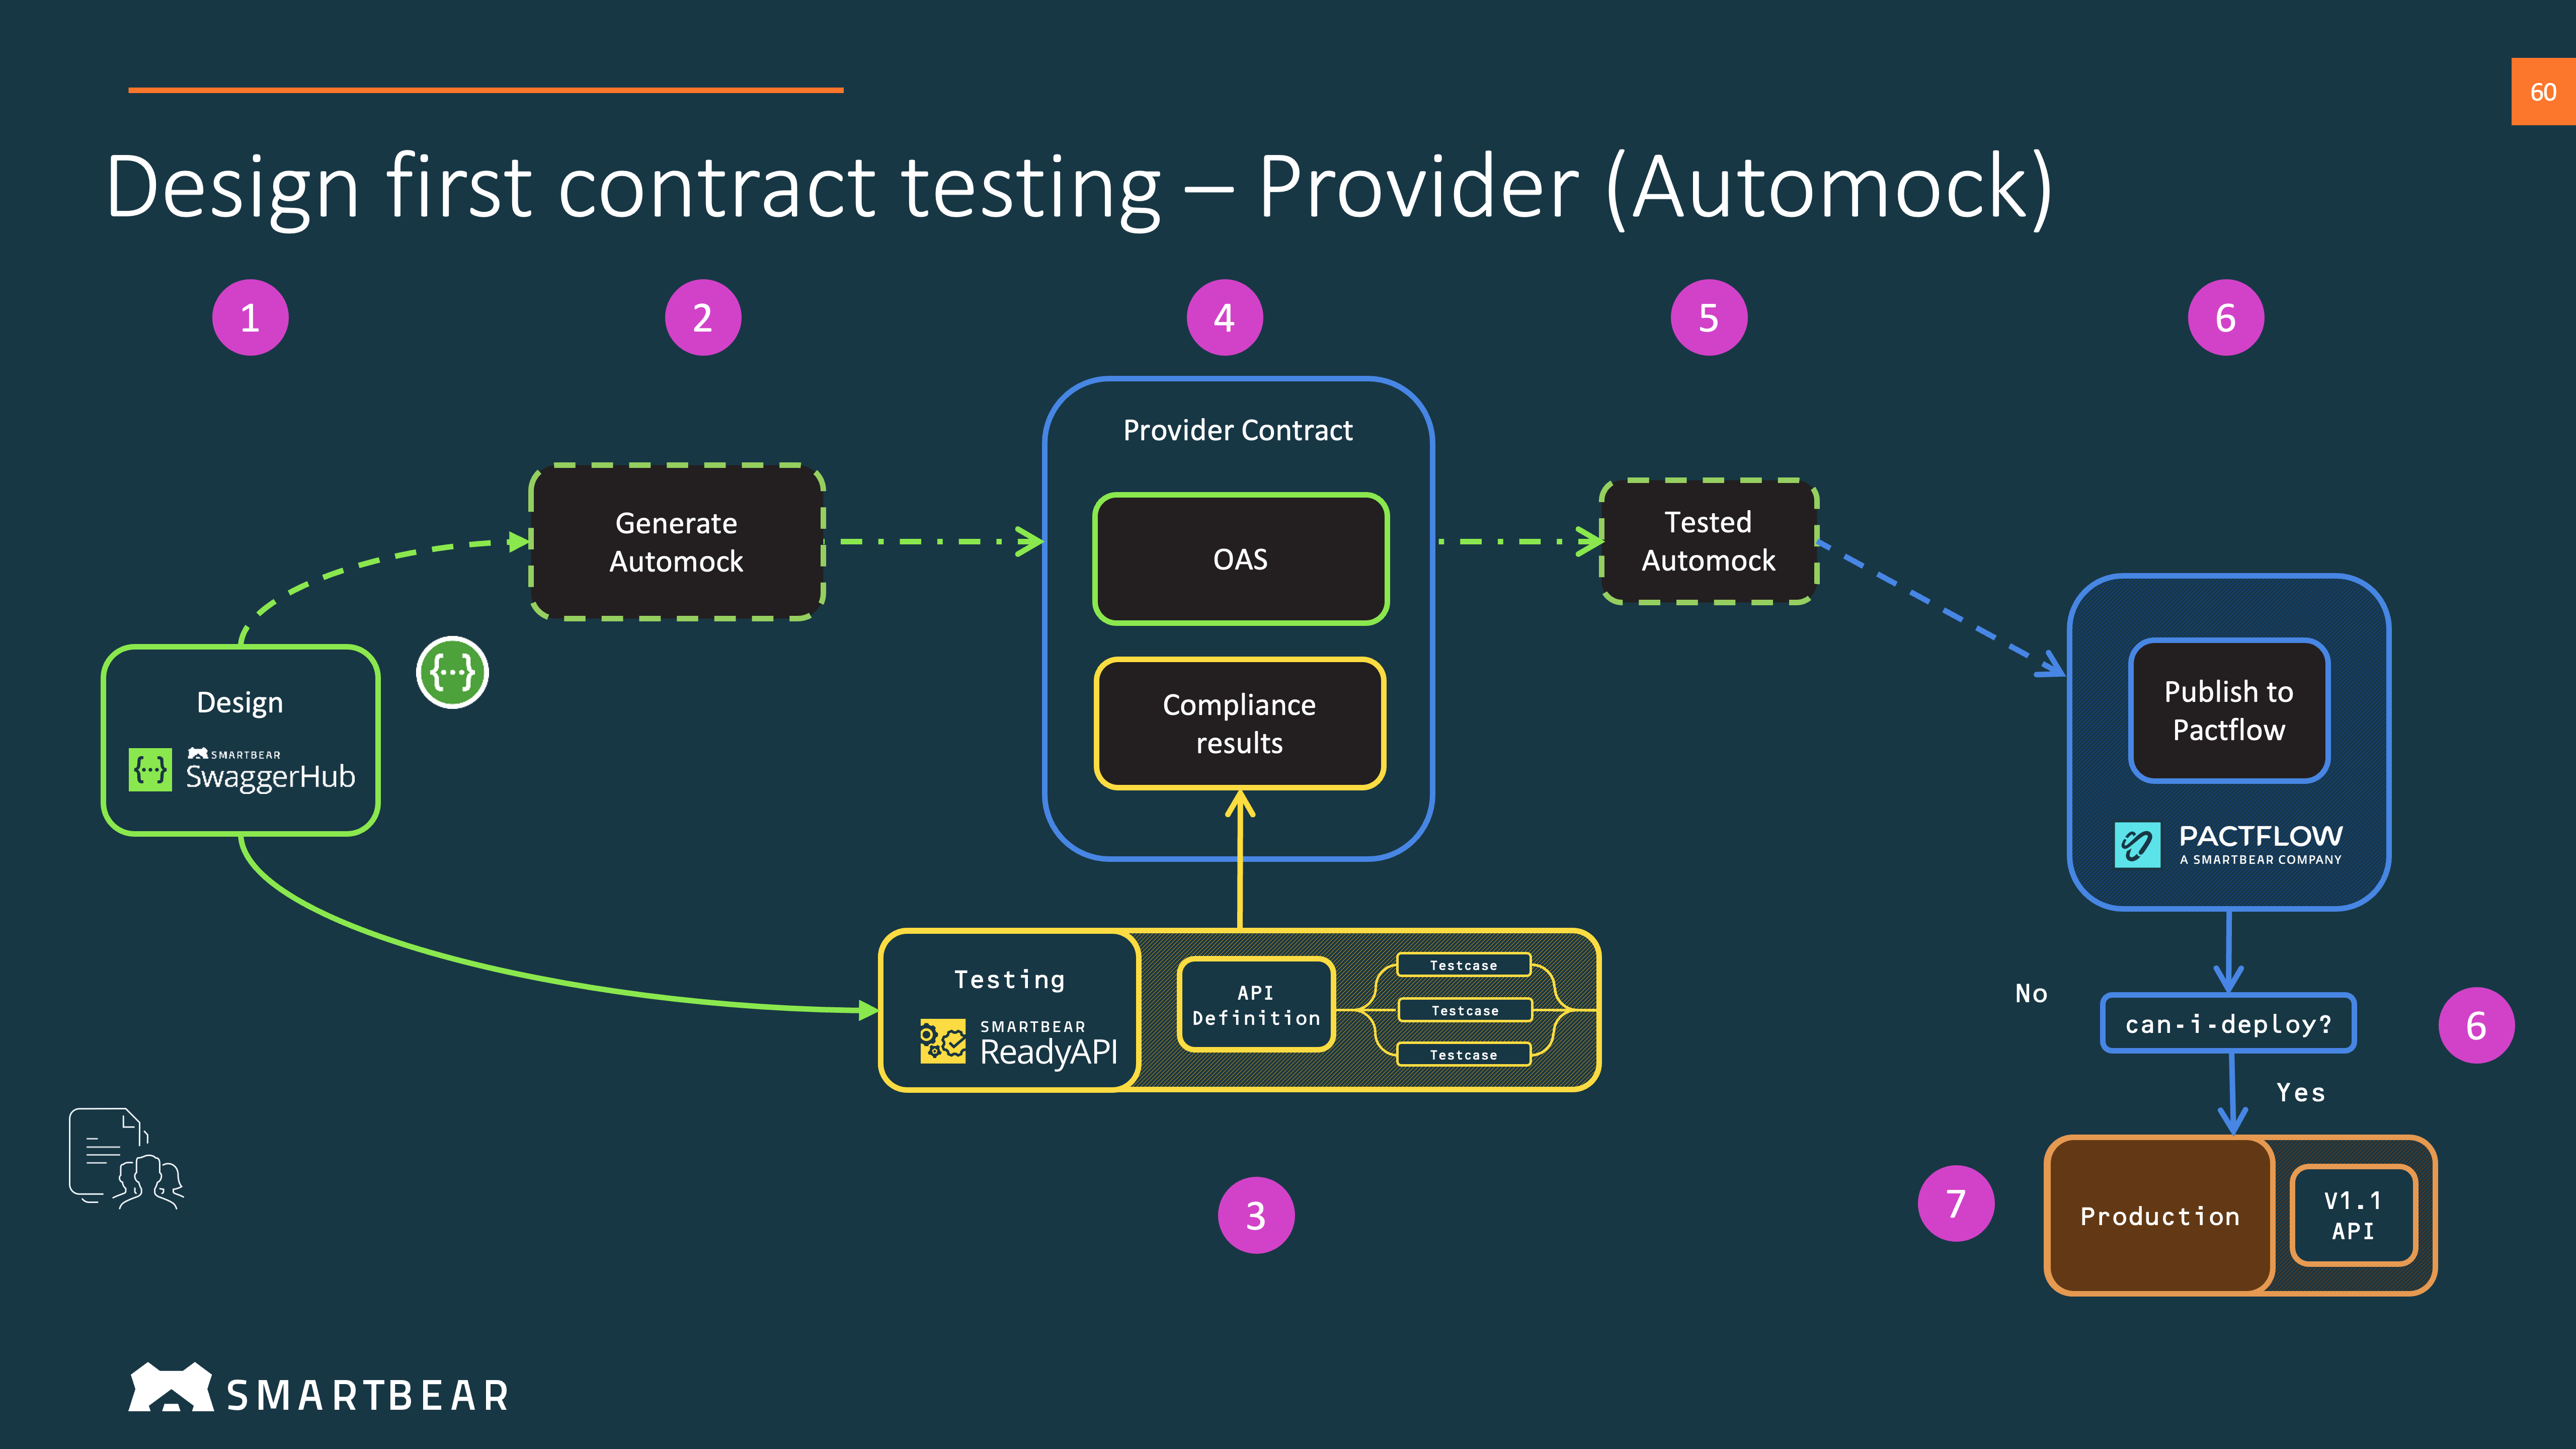
- Create a new Auto Mock virtualisation server (also called "VirtServer").
3. Test your Provider (Auto Mock)
For the general Provider test and release workflow, see our Provider Side Bi-Directional Contract Testing Guide.
3.1 Select a Testing Tool
Now that we have an agreed API definition and an implementation (in this case, a Mock of the provider), we can start to build out our test cases whilst the implementation is underway. We can re-use these tests when the real provider is ready for testing.
Start by choosing an API testing tool. See our examples for an idea of how to do this.
3.2. Publish to PactFlow
Publish your OAS and the API testing tool results to PactFlow.
3.3. Check can-i-deploy if it's safe to release
Check if it's safe to release to your chosen test or staging environment using the can-i-deploy command.
3.4. Release
You can now deploy your Auto Mock. In this case, because the Auto Mock is a hosted service from SwaggerHub you don't need to perform a real deployment. However, we need to tell PactFlow that it has been deployed and will be used as the provider in a nominated environment.
Use the record-deployment command to record that you have implemented this with PactFlow.
4. Consumer Workflow

Consumer Side Bi-Directional Contract Testing Guide
4.1 Create our Consumer
We can start the build of our consumer. We have the choice to build from our own framework or generate an OAS compliant client SDK.
We can optionally use the server mocks from step (2).
4.2 Test our Consumer
We can now test our consumer. This is the stage where we capture the consumer contract. You can use Pact or convert your preferred mocks into a contract file.
See this guide and one of our BDCT examples for an idea of how to do this.
4.3. Publish to PactFlow
Publish your contsumer contract to PactFlow. We suggest using the standard Pact CLI tools for this step.
4.4. Check can-i-deploy if it's safe to release
Check if it's safe to release to your chosen test or staging environment using the can-i-deploy command.
4.5. Release
You can now deploy your consumer to the same environment as your Auto Mock.
Use the record-deployment command to record that you have implemented this with PactFlow.
We now have a consumer deployed to a test environment, that uses Auto Mock. The consumer can't yet be deployed to production, because the provider has not yet been built and released.
5. (Real) Provider Workflow
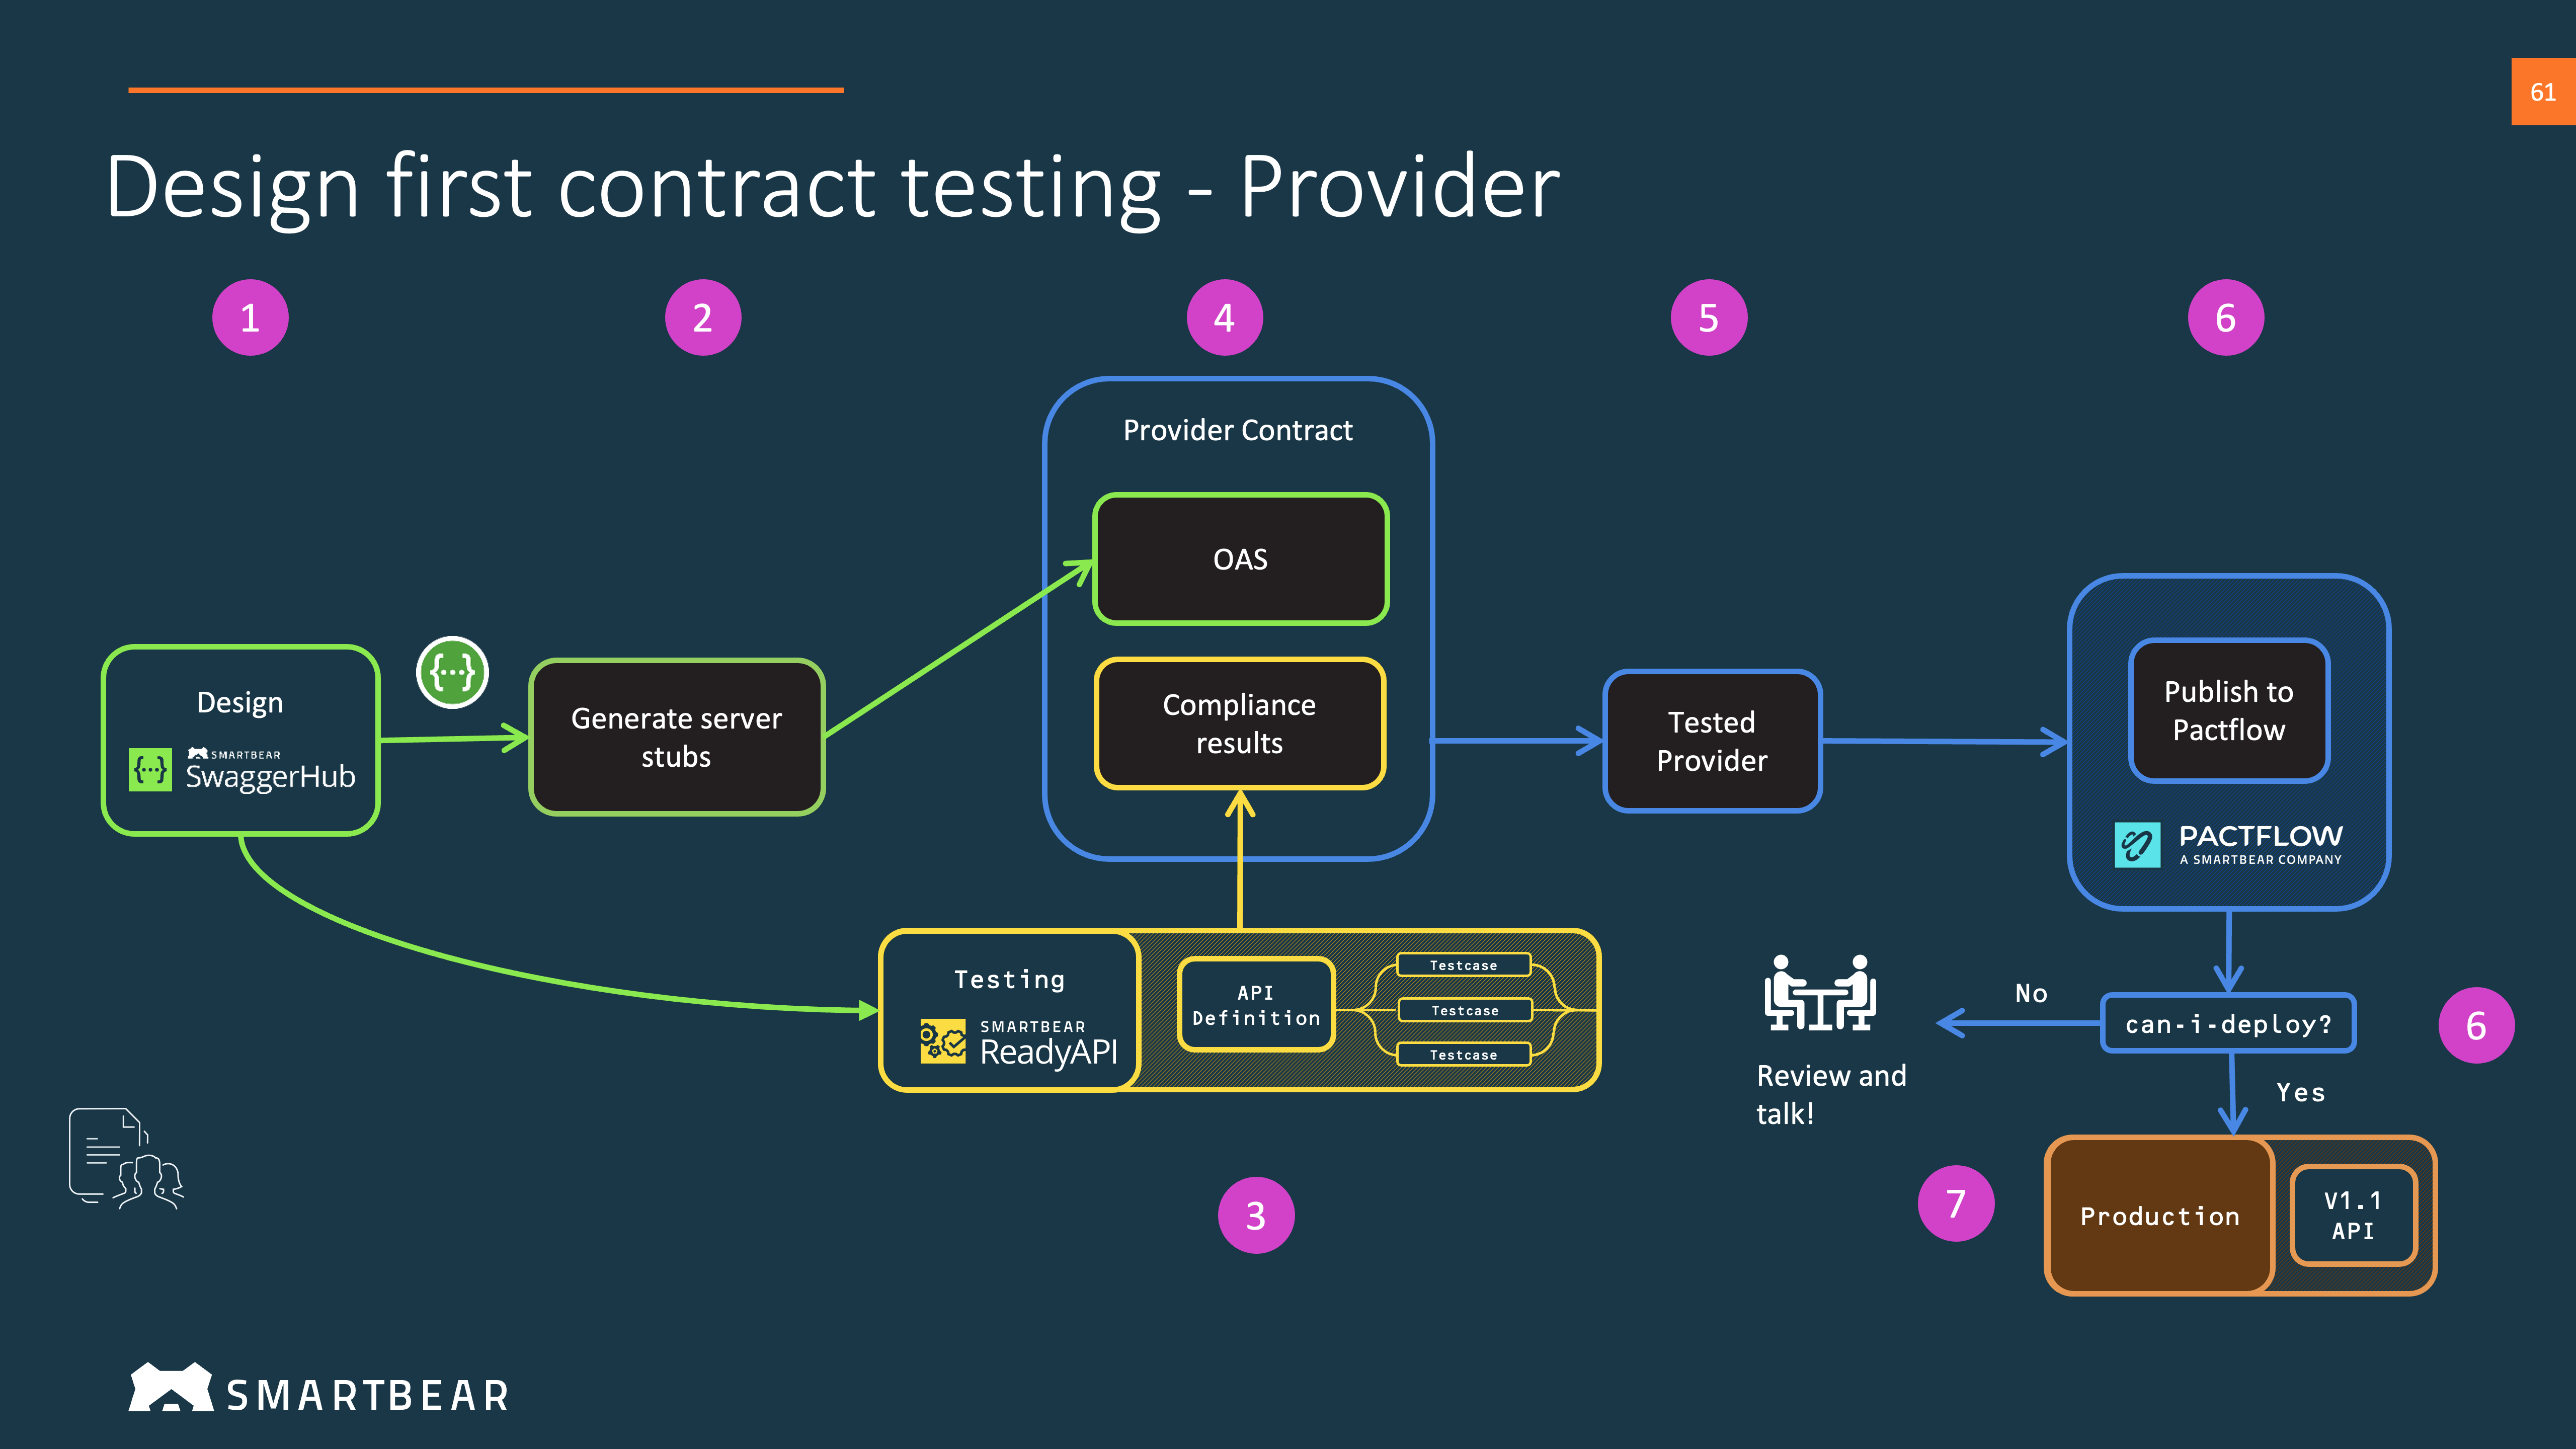
We can now repeat this process, but with the real provider which we can deploy to real environments.
For the general Provider test and release workflow, see our Provider Side Bi-Directional Contract Testing Guide.
5.1 Build the provider
We can start the build of our provider. We have the choice to build from our own framework or generate OAS compliant server stubs.
5.2 Run the tests
Using the test framework created in 3.1, we can test our real implementation.
5.3. Publish to PactFlow
Publish your OAS and the API testing tool results to PactFlow.
5.4. Check can-i-deploy if it's safe to release
Check if it's safe to release to your chosen test or staging environment using the can-i-deploy command.
5.5. Release
You can now deploy your real provider to the nominated test environment.
Use the record-deployment command to record that you have done this with PactFlow.
Next steps
We can repeat steps 3-5 for the various environments and as we iterate on the design and implementation.