5. Deploy the provider to production
If you are running in github actions, we will do the publish and deploy step all in one here, as we are running our example from the master/main branch
Now that we have tested our provider and published our provider contract, we can deploy the application to production.
Whilst we don't currently have any consumers to worry about, we want to be prepared for when we do. PactFlow has a tool called can-i-deploy to help us.
The can-i-deploy command is an important part of a CI/CD workflow, adding stage gates to prevent deploying incompatible applications to environments such as production.
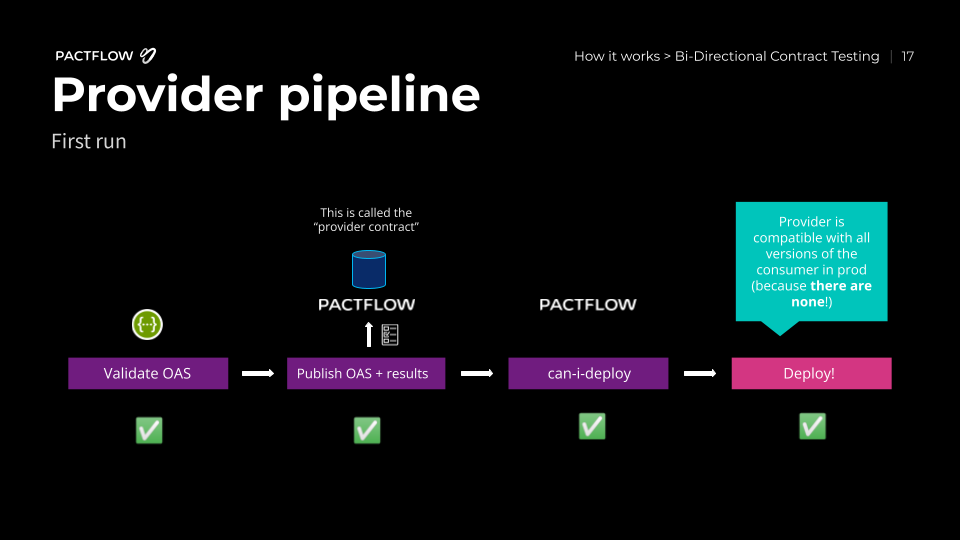
This diagram shows an illustrative CI/CD pipeline as it relates to our progress to date:
Deploy the provider to production via your local machine
Let's run the command:
npm run can-i-deploy
This should pass, because as we discussed above, there are no consumers:
$ npm run can-i-deploy

> product-service@1.0.0 can-i-deploy /root/example-bi-directional-provider-dredd
> pact-broker can-i-deploy --pacticipant pactflow-example-bi-directional-provider-dredd --version="$(npx @pact-foundation/absolute-version)" --to-environment production

npx: installed 47 in 2.835s
Computer says yes \o/

There are no missing dependencies
Later on, when consumers start to use our API, we will be prevented from releasing a change that results in a backwards incompatible change for our consumers. Consumers will also use this command to ensure they are compatible with the Provider API in the target environment (in this case, production).
We can now deploy our provider to production. Once we have deployed, we let PactFlow know that the new version of the Provider has been promoted to that environment:
npm run deploy
This allows PactFlow to communicate to any future consumers of the provider, that the OAS associated with this version of the provider is supported in production. If a consumer adds functionality that uses a subset of the OAS, they will be free to deploy safely!
Expected state by the end of this step
- The provider build is passing and it is deployed to production ✅
Deploy the provider to production via Github Actions
In the real world, you typically do not deploy manually from local machine.
Instead, you would have a CI/CD pipeline that would run the can-i-deploy command
and then deploy the provider to production, for example on a cloud provider of choice.
Setup deployment environment
This step should only be required if you have a legacy PactFlow account. New users should automatically have a production account created
Create a new production environment to record deployments against
- Log in to your PactFlow account (
https://<your-subdomain>.pactflow.io), and go to Settings > Environments. - Click Add Environment
- Enter
productionfor the name and display name - Check the "this is a production environment" checkbox
- Select the default team
- Click "Create"
Configure provider pipeline
- Create a Github Secret to store your PactFlow API token in.
- In PactFlow:
- Log in to your PactFlow account (
https://<your-subdomain>.pactflow.io), and go to Settings > API Tokens. - Click the Copy button for the read/write CI token (make sure it's the read write one, not the read only one).
- Log in to your PactFlow account (
- In Github:
- Open your forked
example-bi-directional-providerproject (https://github.com/<your-username>/example-bi-directional-provider) - Click on the
Settingstab. - Select
Secretsfrom the side menu. - Click
New repository secret(the button is to the right of the "Actions secrets" heading) - Set the name of the secret to
PACTFLOW_TOKEN_FOR_CI_CD_WORKSHOP - Paste in the PactFlow API token value you copied in the previous step.
- Open your forked
- In PactFlow:
- Update your workflow files in GitHub to point at your PactFlow Broker
- In PactFlow:
- Go to Settings > API Tokens.
- Click the
COPY PACTFLOW BASE URLbutton
- In Github:
- Open your forked
example-bi-directional-providerproject (https://github.com/<your-username>/example-bi-directional-provider)- Open
.github/workflows/build.yml - In the upper right corner of the file view, click 🖊️ to open the file editor.
- Update the value of
PACT_BROKER_BASE_URLto the base URL of your own PactFlow account. You can easily get this by clicking the COPY PACTFLOW BASE URL button on the API Tokens page in PactFlow. - Press the green
Commit changesbutton
- Open
- Open your forked
- In PactFlow:
- View the build:
- In Github:
- Select the most recent build, this will have been triggered when you committed the changes in the last page
- In Github:
This build should now successfully publish the provider contract and evidence, and it will pass on the can-i-deploy step before it tries to deploy. This is because the provider has no consumers, so is safe to deploy.
After you have pushed your changes to the workflow files, the provider pipeline will run, fetching and verifying the configured pacts from your PactFlow account, and publishing the results back. The can-i-deploy command will pass, and allow the provider to be deployed. ✅
Expected state by the end of this step
- The provider build is passing and it is deployed to production ✅
Check
Your dashboard should now be updated, noting the provider has now been deployed to production.